A black background and stars complete the drawing. Draw a fog on the Jupiters surface.

How To Draw Solar System Diagram Drawing Very Easy Way Step By Step Youtube Solar System Art Solar System Diagram Planet Drawing
Learn how to draw Solar System simply by following the steps outlined in our video lessons.

How do you draw a solar system step by step. LEARN HOW TO DRAW SOLAR SYSTEM EASY STEP BY STEP NEW DRAWING. Hi friendsIn this video tutorial I will show you how you can draw a solar system drawing very easily and step by stepI am using pencil colors to draw this. This tutorial shows the sketching and drawing steps from start to finish.
This is the same as a top or birdseye view of the property. Estimation of the solar irradiation available on site. LEARN HOW TO DRAW SOLAR SYSTEM EASY STEP BY STEP NEW DRAWING - YouTube.
Accumulate all the loads supplied by the PV System. The plan is typically prepared from data collected during the site survey you performed in Step 4. The lesson begins with a lecture describing the complex process of creation from molecular cloud to planetesimals to planets to organized solar system.
Do not cut or modify parts or rails. 11 CAuTIONS REgARdINg INSTALLATION OF SOLAR POWER SySTEMS Do not stand or step on solar module. We then work to the right adding the earth Mars Jupiter Saturn Uranus and Neptune.
Away from solar modulesCAUTION 1 Do not drill holes in frame. Next step is to fix the solar panels with the mounting structure. You can create a complete solar system.
Care is taken to secure the whole structure properly so that it is sturdy and lasts long. To install a solar electric system in an existing home youll submit one drawing or layout called a plan view or site plan. There are often the sandstorms on this planet and its covered with clouds.
The term photovoltaic can be broken down into photo meaning light and voltaic meaning electricity. The how to draw the Solar System shows how we place the Sun on the left then add Mercury on top of the Sun and Venus next to it. Today i will take a step forward and show you guys how to draw.
Work under dry conditions with dry tools. Install the Solar Panels. Universal Connectors like MC4 are used during wiring because these connectors can be connected with all type of solar panels.
Estimation of a single PV module output at the planned location. Next step is to do the electrical wiring. Draw the surface with the help of the circles and the semicircles on each planet.
All the best solar system cartoon drawing 40 collected on this page. Step 1 Lightly draw a line guide for your picture. On the basis of design loads compute the desired battery capacity.
Tap to unmute. Hi friendsIn this video tutorial I will show you how you can draw a solar system drawing very easily and step by stepI am using pencil colors to draw this. The solar system is easy to draw and the project can be enjoyable for children or anybody interested in astronomy and our place in the universe.
Solar panels contain Photovoltaic cells. 4 Do not install near flammable gases. This can be done easily and gives you a frame to work the rest of your picture around.
How to draw solar system diagram drawing very easy way - step by step. Know the order of the planets. The first step in making a solar system poster is to know how the solar system looks.
The following are the steps needed to generate electricity from solar energy. Start with the sun and then add the planets in the correct order. Establish a load profile and further compute design load and energy.
The lecture is followed up with a drawwrite activity in which the students are required to put in pictures or writing their interpretation of the series of steps that have been presented. This is done by tightening nuts and bolts. Solar panels collect sunlight.
5 Do not drop or allow objects to fall onto module. Easy step by step how to draw Solar System drawing tutorials for kids.
Use a series of curved lines to enclose an irregular butterfly-like shape. Draw the left atrium and pulmonary veins.
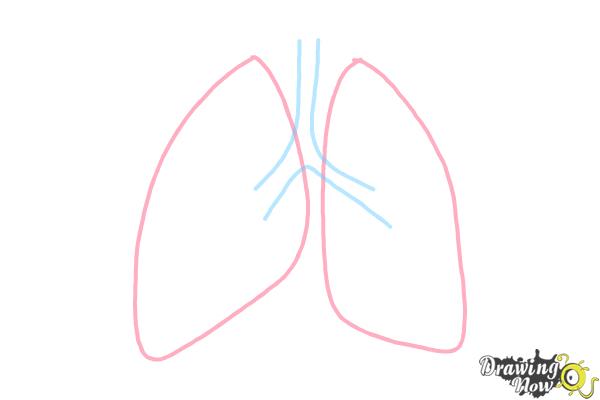
How To Draw Lungs Drawingnow
The first thing you want to do is draw a line for the wind pipe and then two branch lines that will connect to the shapes of the lung pieces.

How to draw a human lungs step by step. Draw the veins on the surface of the lungs. Outline the trachea and bronchi trunk. Below this enclose two nearly square shapes.
Using your lungs as a reference draw an upside-down Y shape centered at the top quarter of the lungs and leading upward to the neck. Make sure not to miss a single step on the lesson how to draw Lungs. Rib Cage drawing - step 1.
Beneath this use curved lines to enclose a drooping T shape. Connect them at the ends using curved lines or ovals. When youre drawing the bottom line make it bump out near the middle.
She has been exposed to the arts for so long. Amanda Reitz grows up with an architect parents. Lightly sketch an oval thats as large as you want the brain to be.
Published by Amanda Reitz. With a unique eye for color Amanda regularly creates privately commisioned color-inspired eclectic upbeat paintings. Draw a horizontal oval that juts out along the bottom line.
Here you will begin drawing the shape of the windpipe which looks like your back bone. Curve the top of the oval in the middle to make the rounded part of the brain. By positioning the body and limbs in different ways you can make your character walk run or even fly.
How to Draw Human Lungs Drawing Step by step. Once youve mastered the outline of the body you can draw a person running. Illustrate a rounded thin and elongated handle.
Note how the sides of the squares bend inward. How to Draw Human Lungs Drawing Step by step. The next step will be learning how to draw the body in motion.
View all posts by Amanda Reitz. Enclose an irregular shape for the atrium. Begin by drawing vertebra the bones of the spine.
Human Heart drawing - step 9. Thanks for watching like comment and subscribeHow to draw Lungslungs humananatomydrawing humanorgan. Make two sponge-like figures on both sides of the handle pertaining for the lungs.
The center point should be at the suprasternal notch and the long part of the Y should extend to the Adams apple. Some people consider the face the hardest aspect to. Extend a curved line upwards from this and then draw the veins using pairs of parallel curved lines.
Get 10 free Shutterstock images - PICK10FREE. Draw two curved lines that are slightly apart and connect at the base of the flower.
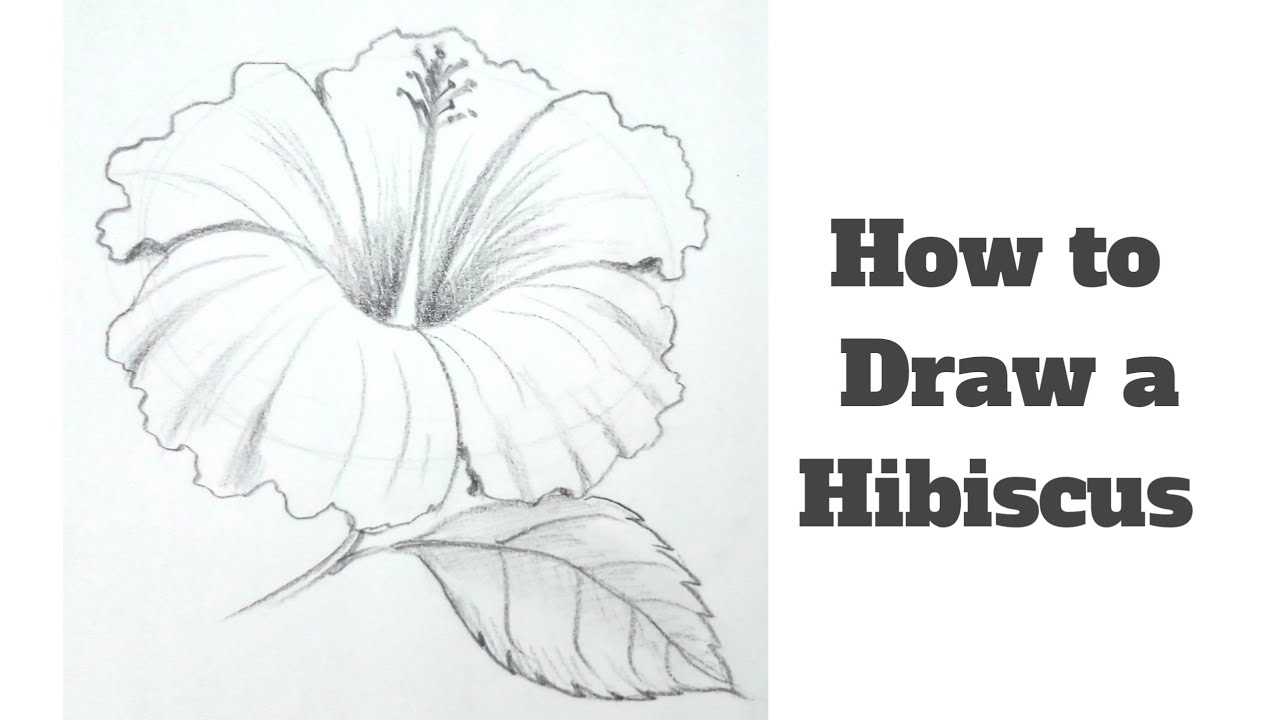
How To Draw A Hibiscus Flower Step By Step For Kids Youtube
Easy step-by-step Tutorial How to paint Hibiscus flower in Watercolor.

How to draw a hibiscus flower step by step easy. How To Draw A Hibiscus Flower Easy Step By Step For Kids Cute. Easy Ways To Draw A. How to draw step by step April 29 2018.
This is a very easy to follow class that anyone can take. The class is an easy 15-minute guide that will teach you the basics of how to draw a hibiscus flower you will learn all the. Sketch the applicable shapes of the interconnected floppy petals attached on it.
WE are going to start the tutorial by sketching a circle for the bud drawing of the flower. How To Draw A Hibiscus Flower easy How To Draw A Hibiscus Flower Step by step Drawing tutorials. How to Draw HibiscusDo something today for your art abilities to be enhanced.
840x885 0 0. Mark the width and height of the image. Flowers For Simple H.
Learn How to Draw a pretty Hibiscus Flower easy step by step drawing lesson tutorial. Hibiscus drawing - step 2. Tutorial Flower How Easy Tuto Article by Rita Petska.
Draw the center part of the flower and add a line through it. Hibiscus Flowers Drawing Tutorial. How To Draw A Cartoon Hibiscus Flower 11 Steps With Pictures.
Check out our step by step art lesson on how to draw hibiscus and you will definitely be able to create a cool and cute drawing. 2Draw a wavy line above it and then make small ovals between them. Step 2Draw the shape of the center.
This slight curve also helps give the flower some weight. Begin by drawing a small oval to form the center of the flower. Draw lines to show the center line of the petals.
Extend a curved wavy line from the flowers center. How to draw a hibiscus flower How to draw a hibiscus flower Step 1Mark off the width and height of the picture. Step by step tutorial teach you how to draw this beautiful hibiscus flower out very simple.
Make a stick. Draw the central parts of the flower and add a line through its. Touch device users explore by touch or with swipe gestures.
You will be drawing amazing flowers in no time. Outline the shape of three hibiscus. Draw the shape of the center and the general shape of hibiscus.
This is a simple step by step follow along video showing you exactly how to draw the beautiful hibiscus flower. How to Draw Flowers Playlist. If kids like it let them follow the steps below to try it out.
1Draw an arc first then draw a wavy line to connect the two ends. Hibiscus drawing - step 1. Drawing Of Hibiscus.
Curve the line around bending it to form a point amid the jagged waves and then reconnect the line to the opposite side of the oval. Today I will be Drawing Hibiscus flower Its a Very Easy Drawing tutorialI Hope you Enjoy this Video_____Name. You can refer to the simple step-by-step drawing guide below.
Take note that its slightly more curved towards the base and straightens out so it looks like the flower is looking to the right. When autocomplete results are available use up and down arrows to review and enter to select. Life is the flower for which love is the honey.
Drawing tutorials for kids and beginners. Jan 22 2016 - How to draw a hibiscus flower step by step.
1041x1080 Tai Lung Lines Annies Album Fan Art Albums Of My Lion King. 600x784 Tai Lung Kung Fu Panda Lungs And Animation.
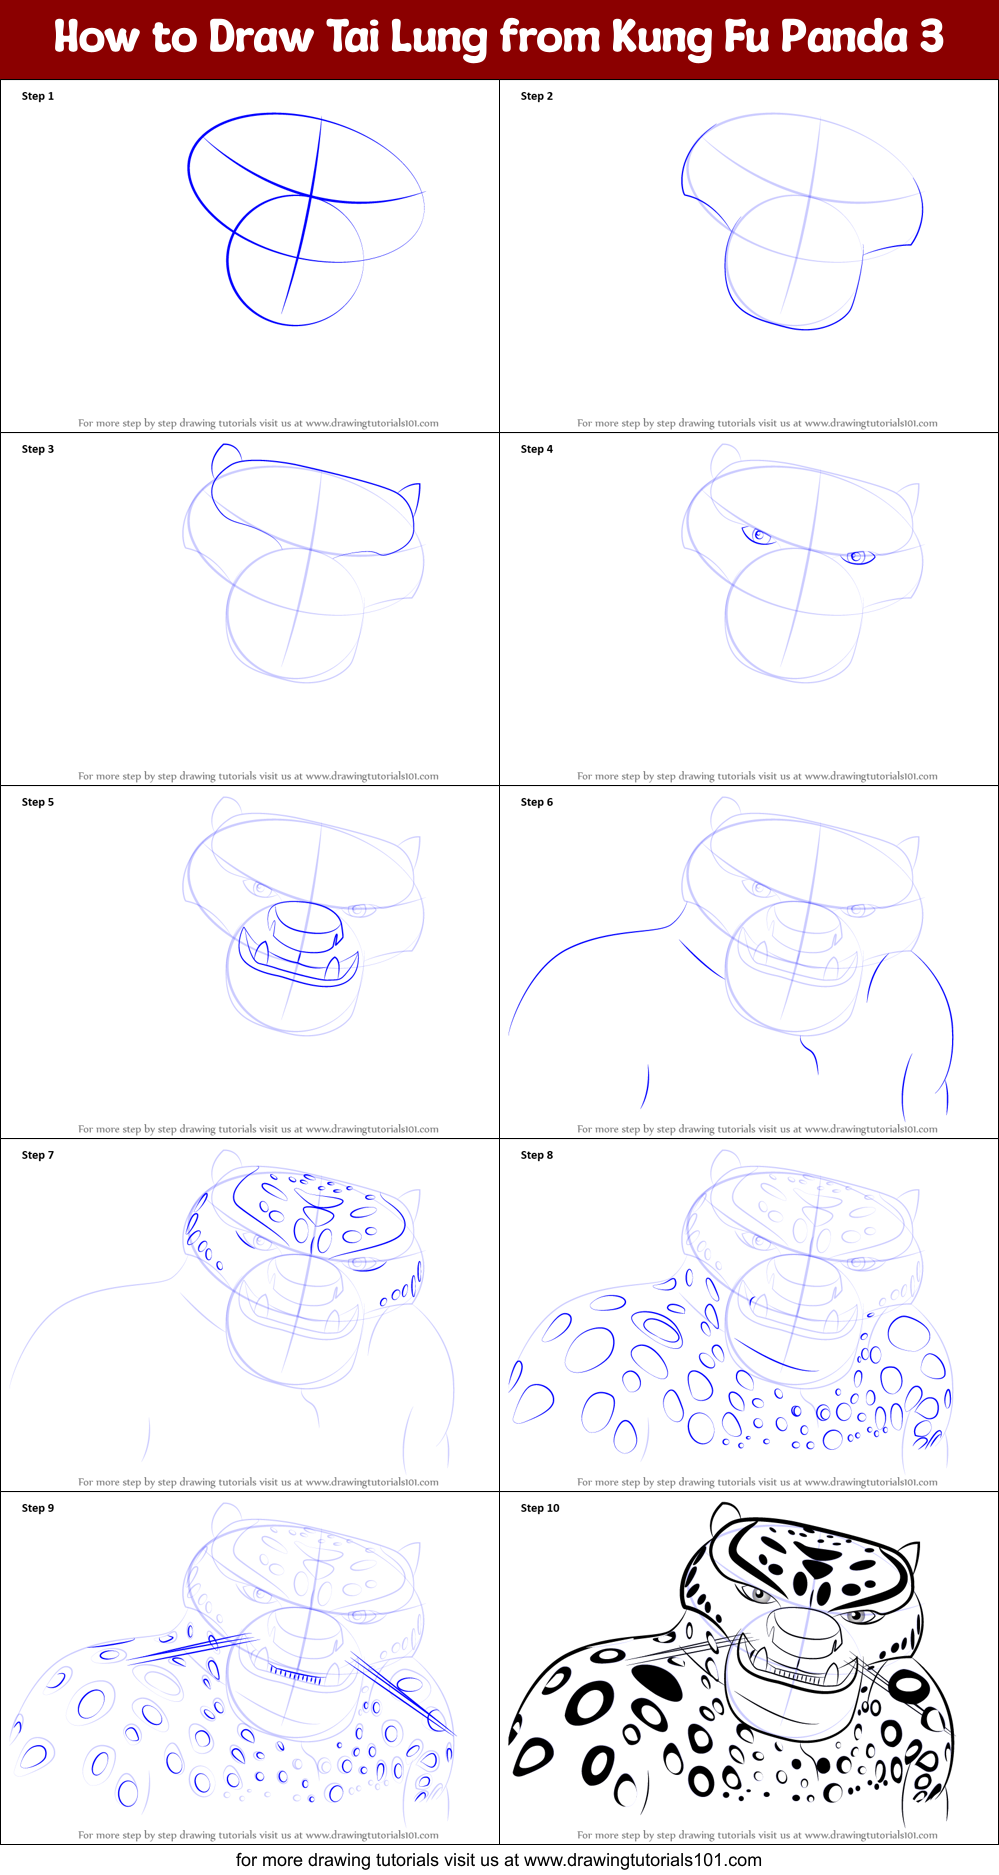
How To Draw Tai Lung From Kung Fu Panda 3 Printable Step By Step Drawing Sheet Drawingtutorials101 Com
This easy step-by-step cartoon drawing tutorial is here to show you how.

How to draw tai lung step by step. 900x1165 Tai Lung Fans. Would you like to draw a pair of cartoon lungs. Thicken and weld the.
How to Draw Tai Lung from Kung Fu Panda 3 step by step learn drawing by this tutorial for kids and adults. The walls of Trachea are. When autocomplete results are available use up and down arrows to review and enter to select.
The right lung is bigger than the left lung and consists of three lobes while the left lung has just two lobes. Lung Drawing at GetDrawings Free download. Step 01 Step 02 Step 03 Step 04 Step 05 Step 06 Step 07 Step 08 Step 09 Step 10 Step 11 Step 12 Step 13.
Her interests also include end-of-life issues advanced directives and furthering organ procurement. Connect them at the top using a narrow oval. Oct 6 2020 - Step-by-step drawing guide of Tai Lung From.
800x566 Step By Step How To Draw Tai Lung From Kung Fu Panda 3. Learn how to draw Lungs simply by following the steps outlined in our video lessons. How To Draw Human Respiratory System Step By Step For Beginners.
433x280 - First by outlining the lungs bronchi and trachea then detailing additional components and accessory. Easy step by step how to draw Lungs drawing tutorials for kids. Lungs drawing - step 2.
Oct 30 2016 - How to Draw Tai Lung from Kung Fu Panda 3 step by step learn drawing by this tutorial for kids and adults. Here you will begin drawing the shape of the windpipe which looks like your back bone. Be sure to add the cross.
Some animals have lung protection built-in - for example camels have a network of hairs in their noses that prevent dust from entering their lungs during a sandstorm. How to Draw Lungs. The first thing you want to do is draw a line for the wind pipe and then two branch lines that will connect to.
All you will need is a pencil an eraser and a sheet of. Lung Drawing at GetDrawings Free download. Step by Step Drawing tutorial on How to Draw Tai Lung Leopard from Kung Fu Panda Tai Lung is the sole antagonist of the Kung Fu Panda seriesHe was the adopted son and the former student of Master Shifu and the powerful master of the leopard style of Kung Fu.
Learn How to Draw Tai Lung from Kung Fu Panda 3 Kung Fu. Oct 30 2016 - How to Draw Tai Lung Leopard from Kung Fu Panda step by step learn drawing by this tutorial for kids and adults. Draw a pair of vertical curved lines that diverge at each end.
Draw a pair of curved lines from the bottom of the trachea. A conduit a structure called Trachea holds oxygen from Nose to Ear a thoracic cavity which opens into two lungs into two divisions called Bronchi. Lungs drawing - step 1.
Let us learn how to draw lungs. How To Draw Tai Lung Kung Fu Panda Sketchok Step By Step Drawing Tutorials How to draw lungslungs diagram kids drawing and painting how to draw taco. How To Draw Lungs Drawingnow.
Oct 5 2017 - Todays drawing is - How to draw a Tai lung easy step by stepLearn drawing by this tutorial for kidsThis video shows step by step instructionswatch try it. How to Draw Lungs Step 1. Charles Vickies practice specializes in the care of critically ill and injured postoperative patients.
Fu kung panda lung tai drawing draw leopard coloring cartoon sketch step pages easy learn steps drawings snow characters lungs. 900x900 Tai Lung Sketch By Nonsensicallogic. Touch device users explore by touch or with swipe gestures.
This forms the trachea or windpipe which connects the lungs to the throat. Oct 30 2016 - How to Draw Tai Lung Leopard from Kung Fu Panda step by step learn drawing by this tutorial for kids and adults.